
 |
Converting a video (an mpg or such) to a frame-by-frame analysis is not as difficult as it may appear, it requires patience and a little creativity. There are many ways to accomplish this task... I am only offering one way, and it may not even be the easiest way. However, it required very little in the form of specialized software ($), so it appealed to the thrifty 'McFee' in me! |
Before you begin, you will need the following:
1) A Windows® Media Player or a player that will allow you to stop the action and freeze the frame.
2) A 'screen capture' software that will allow you copy what is on your screen at any given time. Hopefully it is combined with some sort of Photo Art Program that will allow you to 'trim' and 'resize' your captured 'Screen Shot.'
When I bought a Sony® Digital Camera a while back, it came with a charming little program called ArcSoft® ".Photo Studio "..which costs about $49.99 today and can be accessed through their website at http://www.arcsoft.com .
Okay... here we goooo...
PICTURE ONE: Captured Screen shot
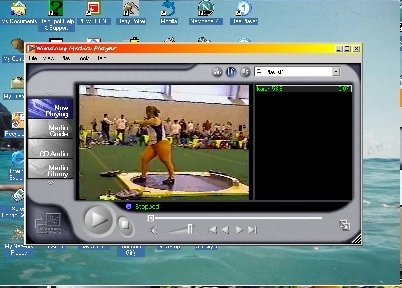 |
| Step 1:
You need to open up your video in your media player ( I prefer Windows®
Media Player) Step 2: Open up your screen capture software and 'capture' your desktop... Step 3: You need to use one of the art tools (the 'dotted square') to select the part of the picture that you will want to use in your sequence. This --in effect- 'trims' your picture. Step 4: You will need to 'resize' and copy your picture (making it smaller) to fit into the final sequence page. |
Okay... Here's where the higher math comes in. There are two things you are going to need to do:
1) You are going to have to determine the final size of the space (see box below) for all of your pictures in pixels or inches (I use Pixels).. and the individual pictures themselves.
NOTE: Most of the pictures on our site are about 250 Pixels wide. The Pictures on this page are 400 pixels wide. If you set the width when you click 'transform' and 'resize', Arcsoft® will automatically adjust the height. This is very cool.
2) You will need to reduce your 'captured' picture in order to fit into the new space.
Your new space ( you will have to
open a 'NEW' page in ArcSoft® in which you will 'copy and paste' each of your
sequence pictures) will be dictated by how many frames you will be placing
there. For example, if you were going want 9 pictures in your new space... and
you have reduced your individual pictures to 250 pixel wide by 170 pixels
tall... the resulting space will need to be 750 X 510.
After you paste your first picture in... your new page will look something like this:
PICTURE TWO: One frame on your New Page!
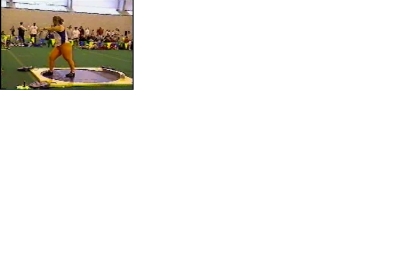 |
| Your 'canvas' now has one picture. You will need to 'copy and paste' your resized photos until you fill the space. The software includes a tool to help you move the picture around. |
NOTE:
You should probably be guided in your
choice of photos
by the positions
you want to see or demonstrate to your athletes. You will note, that in the
throws the action is faster toward the end of the throw and you won't have to
move much in your media player to get to the next interesting position. You
certainly don't want five pictures of the athlete getting ready to throw and
hardly anything when the action happens. You'll have to use your best judgment
here.
PICTURE THREE:
The final Sequence
 |
| Now you
can go back and number each of your frames with the appropriate art
tool (oddly enough it is usually in the shape of a 'letter') You'll have to
play around with the size and color that you think offers the best
contrast. Congratulations! |
Sometimes, it is best to get your athletes to produce the sequence photos for you. Karen always found it helpful to do her own.
If you have any questions or thoughts feel free to write me at rfreberg@charter.net
By the way, here are some
interesting sequences:
Basic Technique in Pictures.
PS. My Ph.D. wife informs me that there is
an easier way using Microsoft Windows' ® screen'
capture, Microsoft® Word®
and an art program... but I'll leave that to you! Frankly, this works for me!